Hello everyone,
Just a quick post of my newest creation:
I used pink and aqua patterned card stock for my base layers, all edges were distressed for extra shabby and vintage feel of this card...
I used Spellbinders Fleur de Lis and Fancy tags dies to create this layered base for Santa's image. The square cardstock has some glitter on it, but was hard to really capture it....
One more view of the finished card...
I am entering this card into following challenges:
Mojo Monday #376
The Shabby Tea Room Challenge #242 with this inspiration photo
and
Vintage Utfordring #92 "Christmas Cards"
I hope you enjoyed this post.
Happy Holidays and thanks for stopping by...
Samra
Sunday, December 21, 2014
Friday, December 19, 2014
Shabby Chic Love Card
Hello everyone,
Here I am with another shabby and chic creation...
Lately I am hooked on texture paste, so I use it when ever I can... My favorite stencil is Prima Damask stencil.
I painted a couple of fleur de lis spellbinders square diecuts with metallic gold paint, added a vintage clock cutout, rustic damask heart cutout and stacked and tucked them underneath a sheer rose ribbon and the sentiment banner...
I created the sentiment on my PC and printed it on vellum.
The shabby bow and rustic fleur de lis embellishment tucked in with the rest of the embellishments...
Here just one more side shot...
I am entering this card into following challenges:
Cardabilities Sketch #113
Just Add Ink #245 with this stunning inspiration photo, which I used the color palette from:
Simon Says Stamp Monday Challenge "Anything Goes"
I hope you enjoyed this post.
Have a wonderful day and thanks for stopping by....
Samra
UPDATE: 12/30/2014
I am simplu ecstatic to announce that my card was chosen as one of the Featured Designers at Cardabilities #113
This is such an honor!!! Thank you!!!
Here I am with another shabby and chic creation...
Lately I am hooked on texture paste, so I use it when ever I can... My favorite stencil is Prima Damask stencil.
I painted a couple of fleur de lis spellbinders square diecuts with metallic gold paint, added a vintage clock cutout, rustic damask heart cutout and stacked and tucked them underneath a sheer rose ribbon and the sentiment banner...
I created the sentiment on my PC and printed it on vellum.
The shabby bow and rustic fleur de lis embellishment tucked in with the rest of the embellishments...
Here just one more side shot...
I am entering this card into following challenges:
Cardabilities Sketch #113
Just Add Ink #245 with this stunning inspiration photo, which I used the color palette from:
Simon Says Stamp Monday Challenge "Anything Goes"
I hope you enjoyed this post.
Have a wonderful day and thanks for stopping by....
Samra
UPDATE: 12/30/2014
I am simplu ecstatic to announce that my card was chosen as one of the Featured Designers at Cardabilities #113
This is such an honor!!! Thank you!!!
Sunday, December 14, 2014
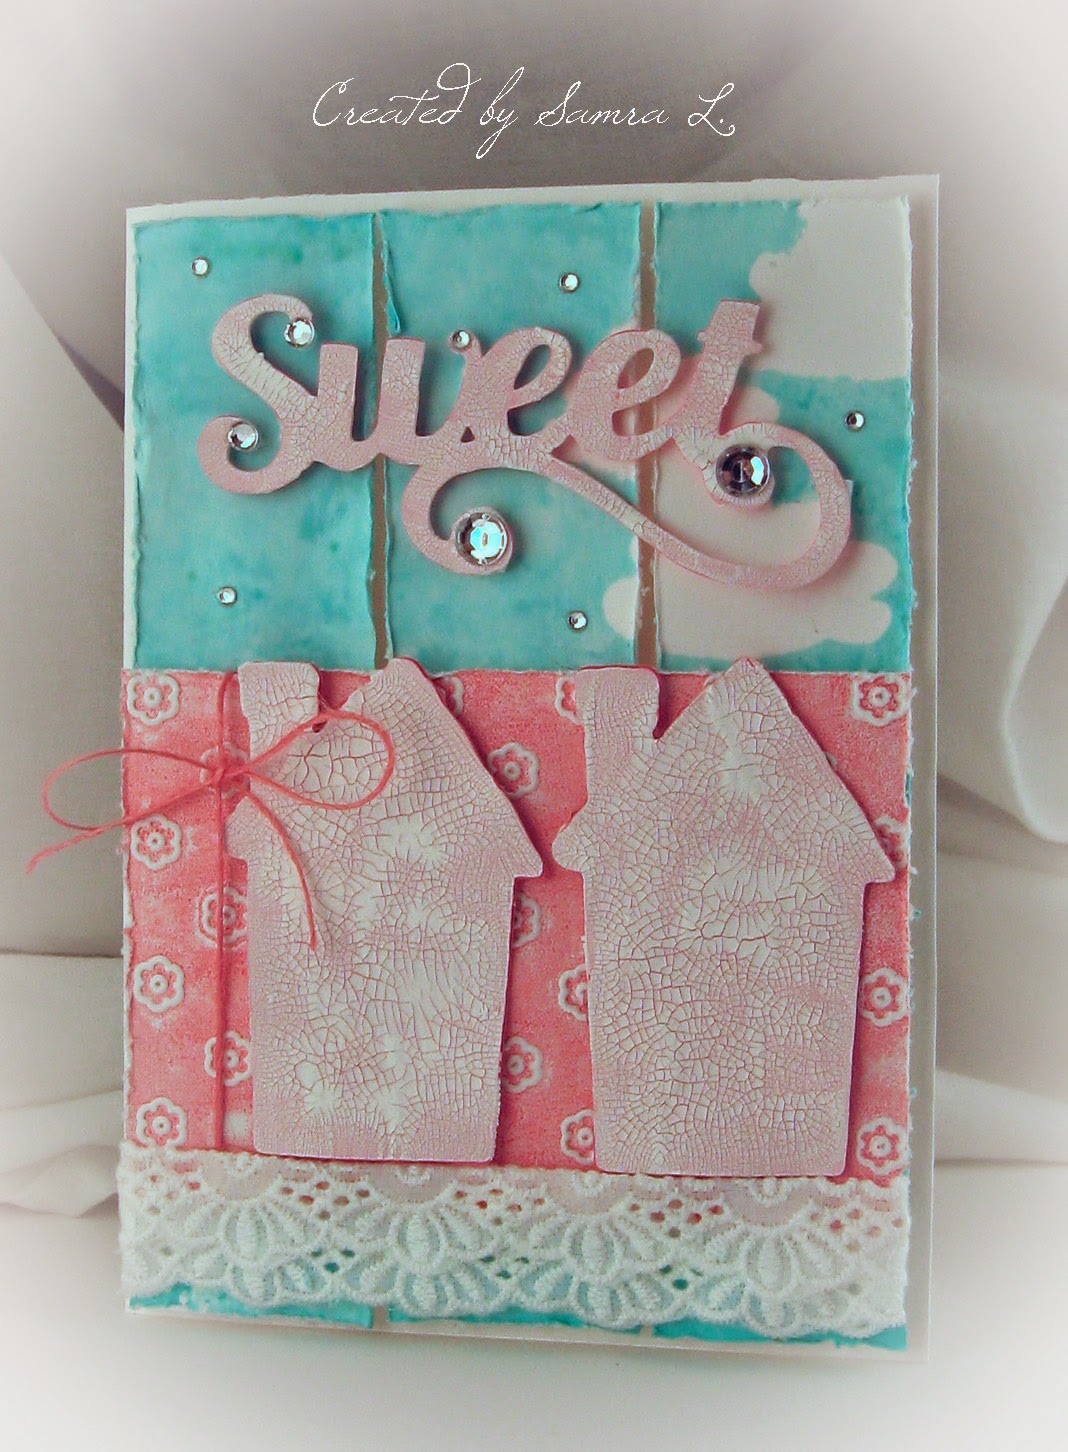
Home Sweet Home Mixed Media Card
Hello everyone,
I would like to show you my latest creation with mixed media details galore:
I used distress spray ink to create the back panels. I cut three strips of white heavy cardstock, attached them to my cricut cutting mat so that they don't move around while I stain them. I sprayed some distress ink onto a wet paper towel and then dobbed it onto the panels. Now before I did that, I glued some cloud cutouts onto the panels. Once the inked panels were dry, I removed the glued cloud cutouts and had the white clouds on my panels. Pretty cool, huh?
I attached the sky panels onto my card using foam adhesive to give the card extra dimension.
The houses were Cricut cutouts. I used pink cardstock for the houses and then covered them with a very thick layer of Distress Crackle Paint Picket Fence. The panel behind the houses is a piece of white cardstock that I embossed with flower embossing folder, but before I ran the cardstock through my cuttlebug I used a brayer to apply distress ink Worn Lipstick onto the debossed side of the embossing folder.
The sentiment is also a Cricut cutout. I used pink cardstock for a cutout and then covered it with the same crackle paint I used for the houses. I added some crystal blings to it, to give it a little bit more vibrant look.
One more look at the card...
I am entering this card into following challenges:
Freshly Made Sketches #166
Just Us Girls Week #271 Mixed Media
and
The Mixed Media Card Challenge #6 "Home"
I hope you enjoyed this post.
Have a wonderful day and thanks for stopping by...
Samra
I would like to show you my latest creation with mixed media details galore:
I used distress spray ink to create the back panels. I cut three strips of white heavy cardstock, attached them to my cricut cutting mat so that they don't move around while I stain them. I sprayed some distress ink onto a wet paper towel and then dobbed it onto the panels. Now before I did that, I glued some cloud cutouts onto the panels. Once the inked panels were dry, I removed the glued cloud cutouts and had the white clouds on my panels. Pretty cool, huh?
I attached the sky panels onto my card using foam adhesive to give the card extra dimension.
The houses were Cricut cutouts. I used pink cardstock for the houses and then covered them with a very thick layer of Distress Crackle Paint Picket Fence. The panel behind the houses is a piece of white cardstock that I embossed with flower embossing folder, but before I ran the cardstock through my cuttlebug I used a brayer to apply distress ink Worn Lipstick onto the debossed side of the embossing folder.
The sentiment is also a Cricut cutout. I used pink cardstock for a cutout and then covered it with the same crackle paint I used for the houses. I added some crystal blings to it, to give it a little bit more vibrant look.
One more look at the card...
I am entering this card into following challenges:
Freshly Made Sketches #166
Just Us Girls Week #271 Mixed Media
and
The Mixed Media Card Challenge #6 "Home"
I hope you enjoyed this post.
Have a wonderful day and thanks for stopping by...
Samra
Saturday, December 13, 2014
Shabby Chic Christmas Stocking Card
Hello everyone,
Just a quick post of my newest creation. It is a simple shabby card with focus on a Christmas Stocking:
I used a piece of plain turquoise card stock as my base, added some heat embossed doily stamps, embossed cardstock for another layer, couple of doilies, stocking, shabby bow embellished with a fancy metal flower, some bling and Tim Holtz stars.
I stamped the doilies on the turquoise cardstock with versamark ink and heat embossed them with snow embossing powder. Then I covered that entire piece of cardstock with a layer of gesso. I wiped the gesso off of the doilies so that they stand out and kind of shine.
The brown piece of cardstock was embossed with a brick wall embossing folder and covered with a very light layer of gesso. I distressed edges of all the layers.
Here is the bow closeup, so that you can see all the loops and shabbiness. :)
One more look at the card from the side.
I am entering this card into following challenges:
House of Cards End of Term Blog Hop with this fantastic inspiration photo
I was inspired by the colors.
Mojo Monday Challenge #375 with this marvelous sketch:
and
The Shabby Tea Room Challenge #241 "Waiting for Santa" with this stunning inspiration photo:
And, Yes! I happen to be a guest designer this week at The Shabby Tea Room :) What an honor that was for me! I hope to join The Shabby Tea Room team some more in the future!
I hope you enjoyed this post.
Have a wonderful day and thanks for stopping by... Your comments and following are truly and greatly appreciated!
Samra
Just a quick post of my newest creation. It is a simple shabby card with focus on a Christmas Stocking:
I used a piece of plain turquoise card stock as my base, added some heat embossed doily stamps, embossed cardstock for another layer, couple of doilies, stocking, shabby bow embellished with a fancy metal flower, some bling and Tim Holtz stars.
I stamped the doilies on the turquoise cardstock with versamark ink and heat embossed them with snow embossing powder. Then I covered that entire piece of cardstock with a layer of gesso. I wiped the gesso off of the doilies so that they stand out and kind of shine.
The brown piece of cardstock was embossed with a brick wall embossing folder and covered with a very light layer of gesso. I distressed edges of all the layers.
Here is the bow closeup, so that you can see all the loops and shabbiness. :)
One more look at the card from the side.
I am entering this card into following challenges:
House of Cards End of Term Blog Hop with this fantastic inspiration photo
I was inspired by the colors.
Mojo Monday Challenge #375 with this marvelous sketch:
and
The Shabby Tea Room Challenge #241 "Waiting for Santa" with this stunning inspiration photo:
And, Yes! I happen to be a guest designer this week at The Shabby Tea Room :) What an honor that was for me! I hope to join The Shabby Tea Room team some more in the future!
I hope you enjoyed this post.
Have a wonderful day and thanks for stopping by... Your comments and following are truly and greatly appreciated!
Samra
Friday, December 12, 2014
Shabby Chic Snowflake Card
Hello everyone,
I made a Holiday Season Greeting Card for my parents that live oversees:
As you can see, this is a shabby chic style card with lots of ribbons, snowflakes, glitter, texture and a fancy shaker. :)
The card is quite dimensional as you can see from the side view...
I added sequins on the snowflakes' points and they change color depending on how you turn the card. Pretty cool :) The shaker inspiration for this particular card comes from the gorgeous card made by Mona Pendleton
I am entering this card into following challenges:
City Crafter Challenge Blog Week #214 "Glittering Snowflakes"
Crafty Cardmakers and More...#129 "Christmas"
Frilly and Funkie Challenge Blog "Vintage Holiday"
Retro Sketches Challenge #144 with this sketch:
and
Try it on Tuesday "Winter Whites"
I hope you enjoyed this post.
Have a wonderful day and thanks for stopping by...
Samra
I made a Holiday Season Greeting Card for my parents that live oversees:
As you can see, this is a shabby chic style card with lots of ribbons, snowflakes, glitter, texture and a fancy shaker. :)
The card is quite dimensional as you can see from the side view...
I added sequins on the snowflakes' points and they change color depending on how you turn the card. Pretty cool :) The shaker inspiration for this particular card comes from the gorgeous card made by Mona Pendleton
I am entering this card into following challenges:
City Crafter Challenge Blog Week #214 "Glittering Snowflakes"
Crafty Cardmakers and More...#129 "Christmas"
Frilly and Funkie Challenge Blog "Vintage Holiday"
Retro Sketches Challenge #144 with this sketch:
and
Try it on Tuesday "Winter Whites"
I hope you enjoyed this post.
Have a wonderful day and thanks for stopping by...
Samra
A Vintage Journey "Let's Celebrate" Challenge
Hello everyone,
I created a card for a lady that is my dear friend's sister and I have an honor to know...This card will be on it's way to Los Angeles, CA next week and I sure do hope that birthday girl likes it when she sees it...
This card measures 6" x 6" and is embellished with a childhood photo of the birthday girl, framed with a card stock frame covered with texture paste stencil and glitter. Since Lisa's favorite color is white, the entire card was made using white embellishments.
I added shabby bow decorated with a fleur de lis charm covered with gesso and sprinkled with glitter. This lady is a hair stylist to the stars so I included a little scissors charm to the bow. :)
The shabby bird cage is also covered with glitter and is holding a piece of seambinding that is used to actually tie the card, just to add to excitement to see what is inside. :)
Inside of this card has a pocket decorated with texture past stencil and glitter and inside the pocket are three tags with wishes for this wonderful lady...
I created the sentiment on my PC and printed it on white heavy card stock. Then I cut it in shape of a banner and attached it to a silicon mold frame covered with glitter.
I also made a pretty box to accompany the card...
I am entering this card into the fabulous challenge
A Vintage Journey "Let's Celebrate"
I hope you enjoyed this post.
Have a wonderful day and thanks for stopping by...
Samra
I created a card for a lady that is my dear friend's sister and I have an honor to know...This card will be on it's way to Los Angeles, CA next week and I sure do hope that birthday girl likes it when she sees it...
This card measures 6" x 6" and is embellished with a childhood photo of the birthday girl, framed with a card stock frame covered with texture paste stencil and glitter. Since Lisa's favorite color is white, the entire card was made using white embellishments.
I added shabby bow decorated with a fleur de lis charm covered with gesso and sprinkled with glitter. This lady is a hair stylist to the stars so I included a little scissors charm to the bow. :)
The shabby bird cage is also covered with glitter and is holding a piece of seambinding that is used to actually tie the card, just to add to excitement to see what is inside. :)
Inside of this card has a pocket decorated with texture past stencil and glitter and inside the pocket are three tags with wishes for this wonderful lady...
I created the sentiment on my PC and printed it on white heavy card stock. Then I cut it in shape of a banner and attached it to a silicon mold frame covered with glitter.
I also made a pretty box to accompany the card...
I am entering this card into the fabulous challenge
A Vintage Journey "Let's Celebrate"
I hope you enjoyed this post.
Have a wonderful day and thanks for stopping by...
Samra
Thursday, December 11, 2014
Coffee Lover Birthday Exploding Box Card
Hello everyone,
I made this exploding box birthday card for a young lady that is a huge coffee lover. I love coffee, but she loves it A LOT!
Anyways here is what I created for her:
I had to leave behind my usual style of shabby chic and create something modern for this young lady. I made a coffee mug using Cricut Tags, Bags, Boxes and more cartridge and added some fluffed up cotton to get the look of frothed coffee.
I typed word coffee in different languages on a piece of vellum and attached it to one of the panels with two cute clothes pins.
I used chipboard letter stickers by American Crafts to create sentiments on other three panels.
I made a gift card holder and attached it to one of the panels. I don't think I even have to mention that gift card holder carried a gift card from her favorite coffee shop. :)
This is how the card looks like closed...
I am entering this project to the following challenges:
Coffee Lovers Blog Hop at Amy Tsuruta's blog Tsurutadesigns.blogspot.com
and
Seize the Birthday "Anything goes Birthday" challenge
I hope you liked this post.
Have a wonderful day and thanks for stopping by....
Samra
I made this exploding box birthday card for a young lady that is a huge coffee lover. I love coffee, but she loves it A LOT!
Anyways here is what I created for her:
I had to leave behind my usual style of shabby chic and create something modern for this young lady. I made a coffee mug using Cricut Tags, Bags, Boxes and more cartridge and added some fluffed up cotton to get the look of frothed coffee.
I typed word coffee in different languages on a piece of vellum and attached it to one of the panels with two cute clothes pins.
I used chipboard letter stickers by American Crafts to create sentiments on other three panels.
I made a gift card holder and attached it to one of the panels. I don't think I even have to mention that gift card holder carried a gift card from her favorite coffee shop. :)
This is how the card looks like closed...
I am entering this project to the following challenges:
Coffee Lovers Blog Hop at Amy Tsuruta's blog Tsurutadesigns.blogspot.com
and
Seize the Birthday "Anything goes Birthday" challenge
I hope you liked this post.
Have a wonderful day and thanks for stopping by....
Samra
Tuesday, December 9, 2014
Simon Says Stamp Monday Challenge "Transportation"
Hello everyone,
Just a quick post before I head to work...
I used a blue damask patterned cardstock as my "sky" base, added hot air balloon cutouts, created a sentiment on my PC and printed it on that cardstock.
I added couple fun clouds and layers of vintage ribbons along with a bow embellished with a jumbo pearl...
One more look at the card...
I am entering this card into Simon Says Stamp Monday Challenge with Transportation Theme
I hope you like this post.
Have a wonderful day and thanks for stopping by...
Samra
Just a quick post before I head to work...
I used a blue damask patterned cardstock as my "sky" base, added hot air balloon cutouts, created a sentiment on my PC and printed it on that cardstock.
I added couple fun clouds and layers of vintage ribbons along with a bow embellished with a jumbo pearl...
One more look at the card...
I am entering this card into Simon Says Stamp Monday Challenge with Transportation Theme
I hope you like this post.
Have a wonderful day and thanks for stopping by...
Samra
Saturday, December 6, 2014
Clean and Somewhat Simple Christmas Card
Hello everyone,
another busy weekend ahead of me...so this post will be short and simple...
Here is my creations:
I used a silver shimmery piece of cardstock for my base and added a layer of vellum ontop of it. Top part of the vellum piece was embossed with brick wall embossing folder.
The wreath was created using one of those floral decoration stems in pearly white color and to add some contrast to it, I painted a few pearls with gesso that was stained with turquoise ink. After that layers dried I sprayed some frost shimmer, which is hard to capture in the photo, at least for me... The bow is grey seam binding ribbon embellished with jumbo crystal.
The sentiment was created on my PC and printed on the silver cardstock. Two birds were attached to silver cardstock as well. Everything looks kind of frosty due to the vellum layer...
One more look at the card...
I am entering this card into following challenges:
City Crafter Challenge Blog Week #240 "A Wreath for this Season" with an inspiration photo
Curtain Call Inspiration Challenge "Clearly Christmas" with inspiration photo
Just us Girls Week #270 "Sparkle" for which I added some crystal sparkly embellishments :)
Merry Monday #137 "Feathered Friends!" for which I added those two birds :) Here is the inspiration photo:
and last but not the least:
Simon Says Challenge "Holiday Cards"
I hope you enjoyed this post.
Have a wonderful day and thanks for stopping by...
Samra
12/08/2014 UPDATE
With great pride I announce that my card was chosen to be one of the honorable mentions at Merry Monday Challenge!
another busy weekend ahead of me...so this post will be short and simple...
Here is my creations:
I used a silver shimmery piece of cardstock for my base and added a layer of vellum ontop of it. Top part of the vellum piece was embossed with brick wall embossing folder.
The wreath was created using one of those floral decoration stems in pearly white color and to add some contrast to it, I painted a few pearls with gesso that was stained with turquoise ink. After that layers dried I sprayed some frost shimmer, which is hard to capture in the photo, at least for me... The bow is grey seam binding ribbon embellished with jumbo crystal.
The sentiment was created on my PC and printed on the silver cardstock. Two birds were attached to silver cardstock as well. Everything looks kind of frosty due to the vellum layer...
One more look at the card...
I am entering this card into following challenges:
City Crafter Challenge Blog Week #240 "A Wreath for this Season" with an inspiration photo
Curtain Call Inspiration Challenge "Clearly Christmas" with inspiration photo
Just us Girls Week #270 "Sparkle" for which I added some crystal sparkly embellishments :)
Merry Monday #137 "Feathered Friends!" for which I added those two birds :) Here is the inspiration photo:
and last but not the least:
Simon Says Challenge "Holiday Cards"
I hope you enjoyed this post.
Have a wonderful day and thanks for stopping by...
Samra
12/08/2014 UPDATE
With great pride I announce that my card was chosen to be one of the honorable mentions at Merry Monday Challenge!
Subscribe to:
Posts (Atom)