Hello everyone,
I created a Thanksgiving card for Paper Sweeties September Inspiration Challenge #23 "Pretty Pumpkins" based on this inspirational photo and color palette:
This is my response:
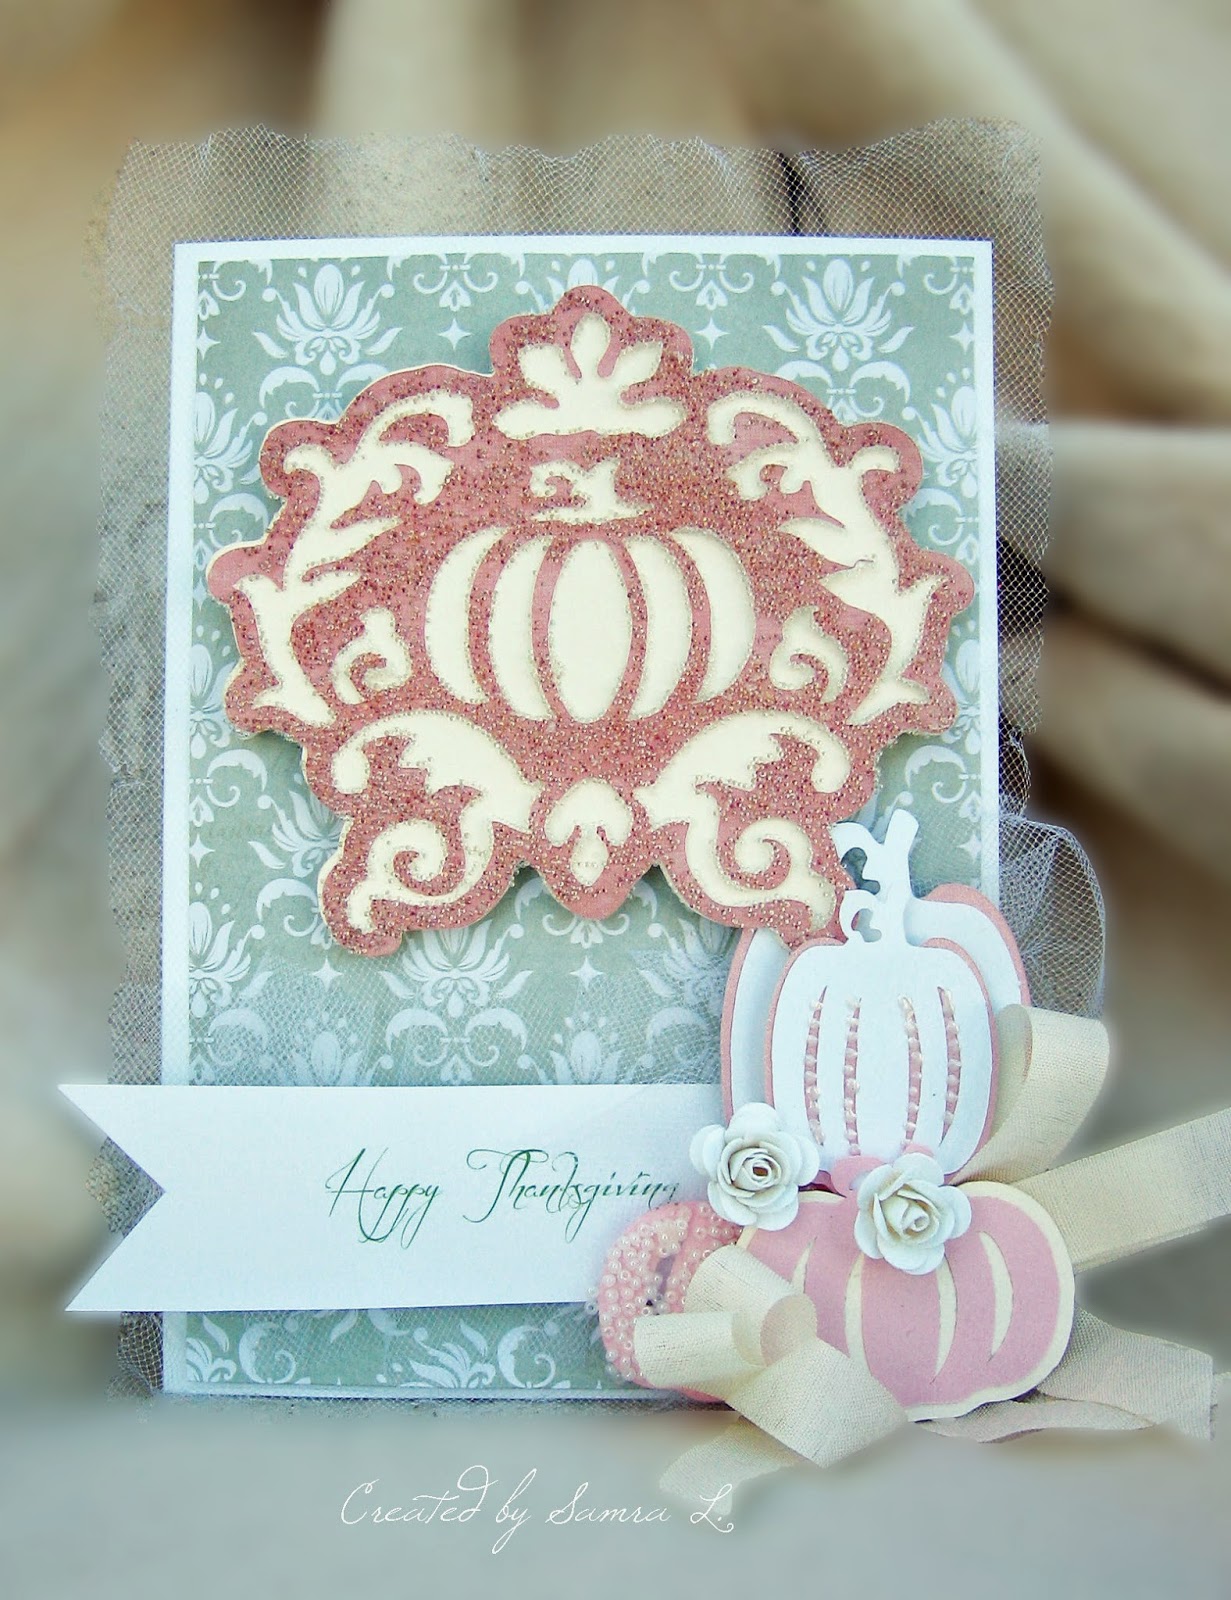
This is the first time I used tulle and microbeads on a card...so give me some slack :) I had a hardest time working with microbeads since I have not really done my research on what was the best way to attach them. I ended up using glue stick as my adhesive, but if someone has a better way, please let me know :) I used a piece of tulle that I cut out about 1/2 inch larger than my card and glued it to the card, then pulled the edges to create some ruffles and tears.
I used Cricut Damask Decor Cartridge for my Pumpkin cutout and sprinkled it with microbeads.
I added a cluster of pumpkins and some handmade flowers along with a seambinding bow.
One more look at the card...
Well, that is it for now. I hope you enjoyed this post.
Have a great day and thanks for stopping by...
Samra
Sunday, September 7, 2014
Thursday, September 4, 2014
Simple & Elegant Thanksgiving Card
Hello everyone,
I have decided to make a Thanksgiving Card that would have color palette from House of Cards September Challenge and the sketch from Mojo Monday #361
Here is my card:
I used patterned cardstock from the Paper Studio Stack Tattered and Worn and DCWV The Rustic stack. I used Spellbinders Fleur de Lis Squares to die cut my layers and embellished the card with an elegant bow and jumbo crystal.
I created three layers using different thickness adhesive foam so everything looks stacked up...
One more look at the card...
And here is the photo and palette from House of Cards:
And the sketch from Mojo Monday Challenge #361
I hope you enjoyed this post.
Have a great day and thanks for stopping by...
Samra
I have decided to make a Thanksgiving Card that would have color palette from House of Cards September Challenge and the sketch from Mojo Monday #361
Here is my card:
I used patterned cardstock from the Paper Studio Stack Tattered and Worn and DCWV The Rustic stack. I used Spellbinders Fleur de Lis Squares to die cut my layers and embellished the card with an elegant bow and jumbo crystal.
I created three layers using different thickness adhesive foam so everything looks stacked up...
One more look at the card...
And here is the photo and palette from House of Cards:
And the sketch from Mojo Monday Challenge #361
I hope you enjoyed this post.
Have a great day and thanks for stopping by...
Samra
Tuesday, September 2, 2014
City Crafter Challenge Blog Week # 227 ~ I See Clearly
Hello everyone,
Does time fly or what?? Here is another week with another super fun challenge at City Crafter Challenge Blog! :) I wish I had known about this blog sooner.
Anyways this week the theme is all about use of acetate, vellum, glossy accents, translucent embossing paste, clear plastic etc and here is what I have come up with:
Clean and simple card with a multilayered vellum flower
I used fun and bright turquoise base colors for my card, some embossing, clothes pin and some distress spray ink for one of the cardstock pieces on the card...
I used Flower Shoppe Cricut Cartridge to cut out different flower shapes in different sizes and then just layered them on top of each other. I embellished the flower with a jumbo glass button.
I attached flower to the card with foam adhesive to give it even more airy look...it almost seems like flower is just floating above the card :)
One more look at the card...
and here is the inspiration photo from City Crafter Challenge Blog Week # 227 ~ I See Clearly
I hope you enjoyed this post...
Have a great day and thanks for stopping by...
Samra
Does time fly or what?? Here is another week with another super fun challenge at City Crafter Challenge Blog! :) I wish I had known about this blog sooner.
Anyways this week the theme is all about use of acetate, vellum, glossy accents, translucent embossing paste, clear plastic etc and here is what I have come up with:
Clean and simple card with a multilayered vellum flower
I used fun and bright turquoise base colors for my card, some embossing, clothes pin and some distress spray ink for one of the cardstock pieces on the card...
I used Flower Shoppe Cricut Cartridge to cut out different flower shapes in different sizes and then just layered them on top of each other. I embellished the flower with a jumbo glass button.
I attached flower to the card with foam adhesive to give it even more airy look...it almost seems like flower is just floating above the card :)
One more look at the card...
and here is the inspiration photo from City Crafter Challenge Blog Week # 227 ~ I See Clearly
I hope you enjoyed this post...
Have a great day and thanks for stopping by...
Samra
Monday, September 1, 2014
One card-3 challenges....
Hello everyone,
Here I am again with another project...Luckily I was off today due to a holiday which gave me extra time to make a card :)
I created a card that I am entering into Artisant Challenge, The Shabby Tea Room Challenge #234 "Reading" and Crafty Cardmakers and more challenge #122 ‘Make an Impression’ (DRY embossing) I found out about Crafty Cardmakers blog from an amazing cardmaker Pamellia
And here is what I created:
I incorporated the sketch from Artisant, reading theme from The Shabby Tea Room and Embossing elements required for Crafty Cardmakers.
I found this pictorial alphabet image in one of the Tim Holtz stacks, as well as Perfect Attendance Certificate and Language Lessons book cover which in my opinion fit just right the Reading theme of The Shabby Tea Room.
I used Darice "notes" embossing folder to create the Notes page from a notebook, and The Paper Studio "script" embossing folder for the banner.
Almost every piece of cardstock on this card has distressed edges that were inked with Antique Linen distress ink and a touch of black ink...
Here is the sketch from Artisant that I used to create this card:
I hope you enjoyed this post...
Thank you so very much for stopping by and have a wonderful day!
Samra
Here I am again with another project...Luckily I was off today due to a holiday which gave me extra time to make a card :)
I created a card that I am entering into Artisant Challenge, The Shabby Tea Room Challenge #234 "Reading" and Crafty Cardmakers and more challenge #122 ‘Make an Impression’ (DRY embossing) I found out about Crafty Cardmakers blog from an amazing cardmaker Pamellia
And here is what I created:
I incorporated the sketch from Artisant, reading theme from The Shabby Tea Room and Embossing elements required for Crafty Cardmakers.
I found this pictorial alphabet image in one of the Tim Holtz stacks, as well as Perfect Attendance Certificate and Language Lessons book cover which in my opinion fit just right the Reading theme of The Shabby Tea Room.
I used Darice "notes" embossing folder to create the Notes page from a notebook, and The Paper Studio "script" embossing folder for the banner.
Almost every piece of cardstock on this card has distressed edges that were inked with Antique Linen distress ink and a touch of black ink...
Here is the sketch from Artisant that I used to create this card:
I hope you enjoyed this post...
Thank you so very much for stopping by and have a wonderful day!
Samra
Sunday, August 31, 2014
With love...bright and fun card
Hello everyone,
This is the second post of the day! It has been quite productive day for me :)
I created this bright and fun card for two challenges: Cardabilities Sketch #106 and Scrap Club Kiev Quest #64: Continuous positive
I used bright yellow cardstock for my first layer, then yellow/white chevron pattern cardstock for my second layer. Double layer banner was created with dark blue and blue/white striped cardstock with rolled up tips for a little bit of a rustic look...
I cut out 7 hearts and embossed them with clear embossing powder to give them that nice shiny look. I layered the hearts using various thickness foam adhesives to give it extra dimensional look. You can see layer upon layer of shiny red hearts :)
Bow was made with baker's twine in red, blue, yellow and white.
I created the sentiment on my PC and printed it on white cardstock. I then rolled it and folded it a little bit for a rustic look.
One more look at the finished card...
And here are Cardabilities Sketch #106
and Scrap Club Kiev Quest#64 inspiration photo:
I hope you enjoyed this post.
Have a great rest of the day and thank you so very much for stopping by...
Samra
This is the second post of the day! It has been quite productive day for me :)
I created this bright and fun card for two challenges: Cardabilities Sketch #106 and Scrap Club Kiev Quest #64: Continuous positive
I used bright yellow cardstock for my first layer, then yellow/white chevron pattern cardstock for my second layer. Double layer banner was created with dark blue and blue/white striped cardstock with rolled up tips for a little bit of a rustic look...
I cut out 7 hearts and embossed them with clear embossing powder to give them that nice shiny look. I layered the hearts using various thickness foam adhesives to give it extra dimensional look. You can see layer upon layer of shiny red hearts :)
Bow was made with baker's twine in red, blue, yellow and white.
I created the sentiment on my PC and printed it on white cardstock. I then rolled it and folded it a little bit for a rustic look.
One more look at the finished card...
And here are Cardabilities Sketch #106
and Scrap Club Kiev Quest#64 inspiration photo:
I hope you enjoyed this post.
Have a great rest of the day and thank you so very much for stopping by...
Samra
Belated Birthday Wishes Card
Hello everyone,
It has been quite hectic in my household, alot of projects going on and too little time to accomplish everything, but I needed to make sure I enter couple of challenges:
Mojo Monday #360 Tall and Skinny and Paper Sweeties inspiration #22 "Let's Celebrate"
I combined the sketch from Mojo Monday and color palette from Paper Sweeties and came up with this card that is actually a belated birthday card for my coworker.
I used patterned cardstock from DCWV "The French Country" Stack, created sentiment on my PC and printed it on beige cardstock. I used Spellbinders oval die cut to for the sentiment and added some seam binding ribbon that I tied into a double bow and embellished it with shabby flower.
One more look at the card, that in my opinion is simple but elegant with a touch of shabbiness. :)
I hope you enjoyed this post.
Have a wonderful day and thanks for stopping by...
Samra
It has been quite hectic in my household, alot of projects going on and too little time to accomplish everything, but I needed to make sure I enter couple of challenges:
Mojo Monday #360 Tall and Skinny and Paper Sweeties inspiration #22 "Let's Celebrate"
I combined the sketch from Mojo Monday and color palette from Paper Sweeties and came up with this card that is actually a belated birthday card for my coworker.
I used patterned cardstock from DCWV "The French Country" Stack, created sentiment on my PC and printed it on beige cardstock. I used Spellbinders oval die cut to for the sentiment and added some seam binding ribbon that I tied into a double bow and embellished it with shabby flower.
One more look at the card, that in my opinion is simple but elegant with a touch of shabbiness. :)
I hope you enjoyed this post.
Have a wonderful day and thanks for stopping by...
Samra
Thursday, August 28, 2014
Shabby Romantic Birthday Wishes
Hello everyone,
I created my fist shaker card! If I had only known how fun those were, I would have tried to make one ways earlier. But thanks to City Crafter Challenge Blog "Shake it up" Challenge I created this card:
I used couple of layers of patterned cardstock for my base, both with distressed edges and I tore the top layer to add some extra diamond shape confetti in the tear.
I added several layers of lace and embroidered ribbon to capture requirements of another two challenges I am entering this card into: The Shabby Tea Room Week#233 "Celebrate" and House of Cards August Challenge "A Sketch"
I created the shaker with Spellbinders Fleur de Lis square die cuts with the top one having an acetate window. I filled the shaker with clear and pink diamond shape confetti. I had hard time finding confetti in local crafting stores and did not have time to order something online...but I was lucky to find these in wedding section of one of the stores. :)
I made the flowers using Cricut Flower Shoppe Cartridge cutouts, soaked them in water that I colored with Ranger Bubblegum Pink ink. I twisted wet flowers, let them dry halfway and then unrolled them partially to give them that rustic look. I added various embellishments to the flowers and added baby's breath branches to the bottom of the flower arrangement. I think it turned out pretty cute, huh?
I created Happy Birthday sentiment on my PC and printed in on heavy cardstock. I cut it out in the shape of a banner and only attached one side of it to the card, so it is kinda floating on top of the card...
One more look at the card from the side, so that you can see how dimensional this card is...
Here are the inspiration images from the challenges:
City Crafter Challenge Blog Week 226 ~ Shake it Up!
House of Cards August Challenge A Sketch
The Shabby Tea Room Week #233 "Celebrate"
I hope you enjoyed this post.
Have a wonderful day and thank you for stopping by...
Samra
Update:
This card of mine won at The Shabby Tea Room Challenge Yay! I am super happy! Thanks to this win I'll be a guest designer on their blog week of December 1st. I am so happy about it!
Thank you ALL my crafting friends!
Samra
09/09/2014
This card won City Crafter Challenge!! Yay! I'll be a guest designer week of 09/30/14 at their blog! How exciting is that???
I created my fist shaker card! If I had only known how fun those were, I would have tried to make one ways earlier. But thanks to City Crafter Challenge Blog "Shake it up" Challenge I created this card:
I used couple of layers of patterned cardstock for my base, both with distressed edges and I tore the top layer to add some extra diamond shape confetti in the tear.
I added several layers of lace and embroidered ribbon to capture requirements of another two challenges I am entering this card into: The Shabby Tea Room Week#233 "Celebrate" and House of Cards August Challenge "A Sketch"
I created the shaker with Spellbinders Fleur de Lis square die cuts with the top one having an acetate window. I filled the shaker with clear and pink diamond shape confetti. I had hard time finding confetti in local crafting stores and did not have time to order something online...but I was lucky to find these in wedding section of one of the stores. :)
I made the flowers using Cricut Flower Shoppe Cartridge cutouts, soaked them in water that I colored with Ranger Bubblegum Pink ink. I twisted wet flowers, let them dry halfway and then unrolled them partially to give them that rustic look. I added various embellishments to the flowers and added baby's breath branches to the bottom of the flower arrangement. I think it turned out pretty cute, huh?
I created Happy Birthday sentiment on my PC and printed in on heavy cardstock. I cut it out in the shape of a banner and only attached one side of it to the card, so it is kinda floating on top of the card...
One more look at the card from the side, so that you can see how dimensional this card is...
Here are the inspiration images from the challenges:
City Crafter Challenge Blog Week 226 ~ Shake it Up!
House of Cards August Challenge A Sketch
The Shabby Tea Room Week #233 "Celebrate"
I hope you enjoyed this post.
Have a wonderful day and thank you for stopping by...
Samra
Update:
This card of mine won at The Shabby Tea Room Challenge Yay! I am super happy! Thanks to this win I'll be a guest designer on their blog week of December 1st. I am so happy about it!
Thank you ALL my crafting friends!
Samra
09/09/2014
This card won City Crafter Challenge!! Yay! I'll be a guest designer week of 09/30/14 at their blog! How exciting is that???
Saturday, August 23, 2014
City Crafter Challenge Week#225
Hello everyone,
This is the second card I made today! I wanted to made sure I don't miss this incredibly fun challenge!
Here is the inspiration photo from the City Crafter Challenge Week#225 :
I was inspired by colors and the little baby dress. Here is my response:
I used white cardstock for the card base and added brown, grey and light brown polkadot cardstock for my layers.
I created the sentiment on my computer and printed it onto white cardstock. I created scalloped edge with border punch and attached banner with clothespin. I added the handmade flower to match little turquoise flower on little girl's hat in the picture.
Dress was made with onesie cutout, some embroidered ribbon and decorated with light brown satin ribbon.
I love using vellum when creating baby cards, it gives extra soft look to the card...
One more look at the finished card....
I had fun with this project, hope you had fun viewing this post.
Have a great rest of the weekend and thanks for stopping by...
Samra
This is the second card I made today! I wanted to made sure I don't miss this incredibly fun challenge!
Here is the inspiration photo from the City Crafter Challenge Week#225 :
I was inspired by colors and the little baby dress. Here is my response:
I used white cardstock for the card base and added brown, grey and light brown polkadot cardstock for my layers.
I created the sentiment on my computer and printed it onto white cardstock. I created scalloped edge with border punch and attached banner with clothespin. I added the handmade flower to match little turquoise flower on little girl's hat in the picture.
Dress was made with onesie cutout, some embroidered ribbon and decorated with light brown satin ribbon.
I love using vellum when creating baby cards, it gives extra soft look to the card...
One more look at the finished card....
I had fun with this project, hope you had fun viewing this post.
Have a great rest of the weekend and thanks for stopping by...
Samra
Christmas in August
Hello everyone,
Last week I have decided to kick off my Christmas card collection...
I created this card to enter it into two challenges: Mojo Monday #359 & Scrapclub Kiev Quest #62:Palette "summer cool".
This is my creation:
I used a piece of blue jean material as my background. I've wanted to do that for quite some time! Pulled some of the threads to give it distressed look. I used patterned paper and cardstock for the layers, distressing each piece. I created the sentiment on my computer and printed it out on white cardstock. I glued it onto the wreath which made it look like it is floating. :)
I made this wreath with branches using Martha Steward Branch Paper Punch. Love that little thing! Came in handy with variety of my projects. I used 110lb white cardstock for the branch punch which made the branches very sturdy and dimensional. As you can see in this photo, branches stand out quite a bit.
Now my favorite part of this card! The white poinsettia flower! I just learned this new technique yesterday (new to me, still learning alot along the way)
I used heavy cardstock to cut out the leaves, three different sizes. Then I soaked them in water and twisted them to give them wrinkled look. When the leaves were half way dry I untwisted them and let them dry completely. Then I glued them with hot glue all together to create the flower and decorated the center with jumbo pearl. I used the flower as double bow embellishment.
One more look at the finished card....
And here are the sketch and inspiration photo from mentioned challenges that I am entering with this card:
I hope you enjoyed this post...
Have a wonderful day and thanks for stopping by...
Samra
Last week I have decided to kick off my Christmas card collection...
I created this card to enter it into two challenges: Mojo Monday #359 & Scrapclub Kiev Quest #62:Palette "summer cool".
This is my creation:
I used a piece of blue jean material as my background. I've wanted to do that for quite some time! Pulled some of the threads to give it distressed look. I used patterned paper and cardstock for the layers, distressing each piece. I created the sentiment on my computer and printed it out on white cardstock. I glued it onto the wreath which made it look like it is floating. :)
I made this wreath with branches using Martha Steward Branch Paper Punch. Love that little thing! Came in handy with variety of my projects. I used 110lb white cardstock for the branch punch which made the branches very sturdy and dimensional. As you can see in this photo, branches stand out quite a bit.
Now my favorite part of this card! The white poinsettia flower! I just learned this new technique yesterday (new to me, still learning alot along the way)
I used heavy cardstock to cut out the leaves, three different sizes. Then I soaked them in water and twisted them to give them wrinkled look. When the leaves were half way dry I untwisted them and let them dry completely. Then I glued them with hot glue all together to create the flower and decorated the center with jumbo pearl. I used the flower as double bow embellishment.
One more look at the finished card....
And here are the sketch and inspiration photo from mentioned challenges that I am entering with this card:
I hope you enjoyed this post...
Have a wonderful day and thanks for stopping by...
Samra
Subscribe to:
Posts (Atom)


.jpg)


