My Etsy Shoppe

Monday, March 30, 2015

City Crafter Challenge Week #255 "Polka Dots"

Hello everyone,

It is time for a brand new challenge over at City Crafter Challenge Blog and this week's host is Stella
She would like to see a project made using a polka dotted stamp, embossing folder, patterned paper or polka dots embellishment.

Here is our inspiration photo:


...and this is what I created:


I used pink polka dot cardstock as my first layer, covered it with gesso and distressed the edges. Then I used a piece of white cardstock and applied turquoise colored texture paste and applied it with polka dot stencil. The sentiment was created on my PC and printed on heavy white cardstock. I cut it in the shape of banner, my favorite way to add sentiment :) and then dabbed some distress paint to shabby it up.


I created a cluster of embellishments using a doily, birdcage, bird, handmade flowers and a shabby bow...


Bent corners give it even more of a shabby look...


One more look at the finished card...

Darnell is our guest designer this month :) Please make sure you visit and check out her fabulous work...

And stop by my teammies to see their stunning work:


and


I hope you enjoyed this post...
Have a wonderful day and thanks for stopping by...
Samra

Thursday, March 26, 2015

Steampunk meets Spring

Hello everyone,

just a quick post of my latest creation:


I used a piece of cardboard as my base, covered it with scrunched up tissue paper, then texture paste applied through Tim Holtz Harlequin Stencil. Then I arranged all kinds of embellishments to create my collage and covered everything with gesso.


I used Sizzix Tim Holtz Alterations Industrial embossing folder to emboss air balloon and mannequin...


After gesso was dry, I randomly applied Peeled Paint, Mowed Lawn and Antique Linen Distress Paint onto my collage and then spritzed it with water letting colors run and mix...After that layer of paint was dry, I dabbed some Picket Fence Distress Paint here and there. I was influenced by January and March Tim tags when applying paints.


I added sentiment plate at the end and colored it with Mowed Lawn and Picket Fence Distress Paint...I had to add some bling here and there, to girly up this arrangement :)

I am entering this card into following challenges:


Craft Hoarders Anonymous March Challenge "Go Green" ( their last challenge :(( )

Mixed Media World March Challenge "Anything Goes"

A Sprinkle of Imagination March Challenge (All the distress paints I used in the project can be found in that online store)

and

A Vintage Journey "Anything Tim"

I hope you enjoyed this post...
Have a wonderful day and thanks for stopping by...

Samra

04/20/2015 UPDATE

With great pride and joy I announce that this card was selected as one of the favorites at Craft Hoarders Anonymous March challenge "Go Green"


Monday, March 23, 2015

City Crafter Challenge Week #254 "Let's Go Ombre"

Hello everyone,

It is time for a new challenge at City Crafter Challenge Blog!
This week's host is Ros and she would like to see projects with ombre effect added to either entire card or detail on it...
Here is the inspiration photo and you can chose any shade:


I went with blue shades, my favorite :)


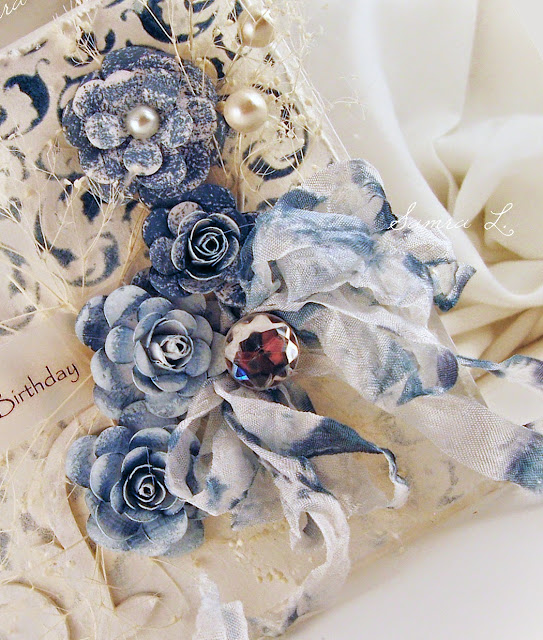
I used a damask stencil and inked the base with Faded Jeans Distress Ink. That is where I incorporated my ombre effect. I went from heavy applied ink to very light to get that fading effect...


Even my handmade flowers are ombre :)


The shabby bow was hand died with Faded Jeans Distress Ink.


I added a wooden swirl that I painted white and a Happy Birthday sentiment printed on vellum...mixture of textures gives it quite a nice look, I think.


One more look at the finished card...

Darnell is our guest designer for the month of March. Please stop by her lovely blog to check out her fabulous creations. :)
And of course check out my teammies' amazing work:


and

Stella

This past weekend I had an honor of meeting Kirsty for the first time. We both live in Las Vegas but never had a chance to meet. We had nice lunch and got to know each other better...
What a treat that was for me!!


I hope you enjoyed this post...
Have a wonderful day and thanks for stopping by...
Samra

Saturday, March 21, 2015

Vintage Flowers and Doilies Card

Hello everyone,

Just a quick post of my latest project.


I made all the flowers using Spellbinders flower die, arranged them ontop of two doilies and a piece of vintage style patterned cardstock.


Majority of the flowers were distressed with Old Paper Distress Ink...


Some of the flowers were attached to the card with extra foam adhesive to give that dimensional look...


I added some bling that peaks underneath the cluster of flowers...

I am entering this card into following challenges:

Artisant Spring Challenge

Frilly and Funkie Challenge "Bring On The Bling"

Scrap & Craft Inspiration Challenge #5 "Flowers"

and

Vintage Utfordring #98 "Doily"

I hope you enjoyed this post...
Have a wonderful day and thanks for stopping by...
Samra

04/01/2015 UPDATE

I am so happy to announce that this card was selected as one of the Top 3 at Scrap &Craft Inspiration Challenge#5 "Flowers"


04/10/2015 UPDATE

I am thrilled to announce that this card was selected as on of the Top 3 at Vintage Utfordring #98 "Doily" Challenge :)


04/10/2015 UPDATE

I am so happy to announce that this card was selected to be the Winner at Artisant Spring Challenge :)

Thursday, March 19, 2015

Happy Birthday AVJ

Hello everyone,

First of all I need to warn you this is a verrrryyyy loooong post. :( Sorry about that... and second of all I would like to thank Belinda Basson for encouragement!

When I saw that A Vintage Journey Challenge Blog was celebrating their 1st birthday this month, I decided to create something very special for that occasion. I created a shadow box that looks like a book.


I'll show you how it all started...


I cut out a piece of cardboard from a box and covered it with glue inside and out and adhered white tissue paper that was previously all scrunched up. When that was dry I applied gesso and then crackle paste. I scored and cut a piece of heavy white cardstock to create a shadow box. AVJ monogram and all other cutouts you see in this collage were created from 6 cutouts each all glued together to give then extra dimension. Then all the cutouts were covered with black soot crackle paint. Keyhole and the key were embellished with liquid pearls prior to applying crackle paint.


Once the "book cover" was dry I applied distress paints: Black Soot, Vintage Photo, Rusty Hinge, Walnut Stain, Fired Brick and Antique Linen. There was alot of water spritzing, applying some more paint, then some more water spritzing involved in this process...And pictures above show the final product of it...


You can see what inks and stamps I used to create the shadow box and the beginning stage of it...


Once all the paint was dry, I adhered the cutouts...


Volume 1 represents the first birthday of AVJ of course :)


This is how the inside of the book looks like... It is a shadow box with a butterfly and metal trinkets....


I added the metal plate "enjoy the journey" on the top and colored it with Fired Brick Distress Paint and embellished it with ruby crystals.


I painted the butterfly with red acrylic paint and then covered it with Black Soot Crackle Paint. Then I applied Distress Paints: Fired Brick, Wild Honey, Tarnished Brass and Mustard Seed and added a few ruby crystals. I added a clock arm to the center to create it's body. You can also see a clock and a couple of gears in the bottom right corner...


This is how the back of the shadow box looks like...

As you can see from the photos and description, this project is not "Anything Tim" it is actually "Everything Tim" I used techniques seen in his tutorials for this years tags, plethora of paints, inks and embellishments...

I am entering this project into following challenges:

A Vintage Journey March Challenge "Anything Tim"

and

The Mixed Media World Challenge "Anything Goes"

I hope you enjoyed this way too long post...
Have a wonderful day and thanks for stopping by...

Samra

04/10/2015 UPDATE

With great pride and joy I  announce my win at A Vintage Journey


Monday, March 16, 2015

City Crafter Challenge #253

Hello everyone,
are you ready for another fabulous challenge at City Crafter Challenge Blog???
Kirsty is our host this week and she picked this gorgeous mood board as our challenge inspiration:


You can pick anything that inspire you from this gorgeous board and create a project. :)

Here is what I made as a part of inspiration for you:


I used different patterned papers in color palette from the moodboard to create this shabby chic nautical themed card.


I found alot of inspiration in the starfish from the inspiration photo and incorporated them into my cluster of ribbon, twine, charms and seashells...


I used alot of gesso to cover the paper as well as metal charms, placed some pearls here and there and distressed edges of most of the papers in this nautical collage...


One more look at the finished card...

Darnell is our fabulous guest designer for the month of March, please make sure you stop by her wonderful blog and check out her amazing work. :)

Also please take a look at my teammies' gorgeous creations:


and


I hope you enjoyed this post...
Have a great day and thanks for stopping by...
Samra

Thursday, March 12, 2015

Shabby Chic Friendship Card

Hello everyone,

Just a quick post of my latest creation:


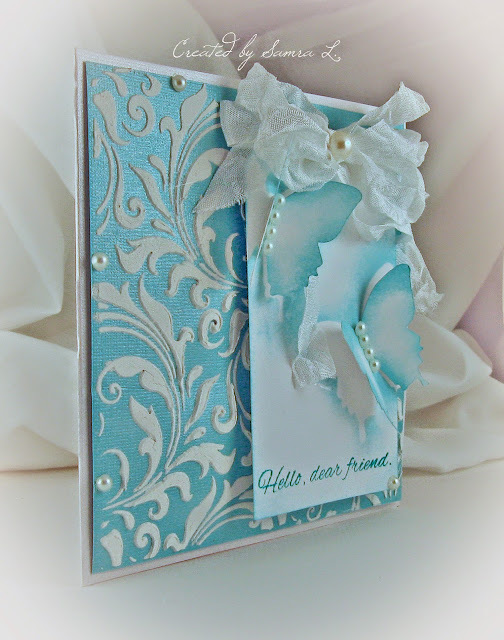
I used a piece of aquamarine color cardstock and applied texture paste through flourish stencil. I added a few pearl here and there...


The tag was inked with Tumbled Glass Distress Ink using masking technique. I added a shabby bow with jumbo pearl and the same butterflies I used for masking. The sentiment is Stamplorations Vignette Trendy Feathers Stamp.


I am entering this card into following challenges:

613 Avenue Create Challenge #114 Anything Goes/ with a twist Aquamarine

Simon Says Stamp Wednesday Challenge "Things that Fly"

Simon Says Stamp Monday Challenge "B is for ...." Butterfly

and

Stamplorations March Challenge I cased Deepti's card.

I hope you enjoyed this post.
Have a wonderful day and thanks for stopping by....
Samra

03/15/15 UPDATE

I am honored to announce that my card made it to Top 3 at 613 Avenue Create :)


Shabby Birthday Card

Hello everyone,

I made a Shabby Chic birthday card for a very dear friend of mine, Lauren. It was hard to capture the true color of this card in my photos. After about twenty tries I decided to just find the best I had. This card is a light lavender color, which is her favorite color and she likes butterflies, so I had to add couple here and there. :)


I used the sketch from Cardabilities to create this design.


I used white cardstock to make flowers and then inked edges with Milled Lavender Distress Ink. All the texture paste flourishes were also inked with the same ink. I added a small clock cutout which is peeking behind the flowers and flourishes.


The texture and dimension is more visible in this photo.


This butterfly looks like it is about to land on the card. I glued is only partially on the bottom part and angled it so that it gives that landing effect.


One more look at the finished card...

I am entering this card into following challenges:

Cardabilities #118 with this gorgeous sketch


Simon Says Stamp Monday Challenge "B is for...." Butterflies and Birthday in my case :)

Simon Says Stamp Wednesday Challenge "Things that Fly"

and

Try it on Tuesday Challenge "Pears for Girls"

I hope you enjoyed this post...
Have a wonderful day and thanks for stopping by...
Samra


03/24/15 UPDATE

I am so thrilled to announce that my card was selected as one of Top 5 at Try it on Tuesday Challenge "Pearls for Girls"